For credit for this part you will need firstly, a table as discussed last week, uploaded to our Moodle account
Before the end of this trimester all blogs caught up and your final PowerPoint project uploaded
In Power Point look at the menu across the top; specific points to be aware of:
File > New Presentation > Save As (save in your 'documents' folder) >
View > Normal (view) > Slide Master (have your slides look the same) > Toolbars (be sure "Standard" and "Formatting" are ticked)
Insert > depending on what you will be adding such as Pictures, Moviews and etc.
and the rest of the toolbar menus go through for what you will need, especially the Action Buttons and Action Settings (under Slide Show)
You PowerPoint must have the following
elements for 100%:
10 % Your table
15 % Creativity/Originality Is your presentation interesting or just 'elevator music for the eyes?' (I get bored very easy)
15% At least five images - not including background images and of course each will be referenced fully.
Your slides will be marked on
14 % Appearance (are your slides easy to view? - see the seven points of a good slide show at http://neuage.info/t-p.htm especially slide number 15)
16 % Content (be sure each slide continues with your story) You need at least fifteen slides but not more than 20.
10% Show time - Three minutes (ten seconds either way)
How to design your own templates that we can use over again today.
You apply a design template to give your slides their look, including the font styles they use; their background image, color scheme, logo, or other art; and their layout.
|
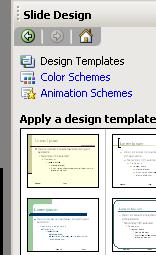
The templates you find in the Slide Design task pane are design templates only. Go to Format > Slide Design (you will see the Slide Designs in the panel on the right)
To create a new template in PowerPoint, you start with one that's already there and then modify it as you choose.
To give yourself the cleanest slate possible, start with the design template
that PowerPoint defaults to whenever you click the New button
 on the Standard toolbar. The picture shows you how the default slide looks
with this template.
on the Standard toolbar. The picture shows you how the default slide looks
with this template.

 When
you open a new, "blank" presentation, the very simple Default Design template is
applied. Use this design as the basis for your new template.
When
you open a new, "blank" presentation, the very simple Default Design template is
applied. Use this design as the basis for your new template.
 This is how the Default Design template is represented in the
Slide Design task pane, which shows you the templates currently
used.
This is how the Default Design template is represented in the
Slide Design task pane, which shows you the templates currently
used.
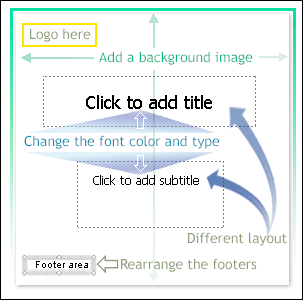
Every design template in PowerPoint includes a slide master. The master stores the styles for the design template. It's the place you go in any presentation to change aspects of the design that's applied.
The picture shows the relationship between the slide master and a slide in the show. The fonts and font styles that are in place on the master for the title and body text are reflected in the title text and bulleted points on the slide.
So if you want to change the font for the title text in the show, you'd just change the title text's font on the master. You can make other presentation-wide changes here, too, such as applying a background design or arranging and sizing placeholders.
While you can change the master to effect design changes throughout any presentation, saving those changes as a template preserves them as a design that can be applied to any presentation.
The slide master sits behind the scenes, in its own place, called master view (more on that in the next section). It is never part of the slide show that people see.
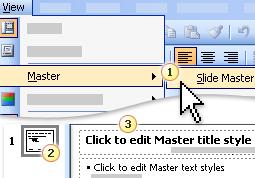
View > Master > Slide Master
A toolbar for your pleasure will drop down - ![]()
In master view, a thumbnail of the slide master appears in the upper left.
The slide master is displayed in the slide pane, ready for you to make changes to it.