Chapter 2
Working with Text
Table of Contents:
Chapter Objectives............................................................................................................................................................................ 1
File Listing.............................................................................................................................................................................................. 2
Projects to Assign:.............................................................................................................................................................................. 2
Lecture Note: Chapter Overview............................................................................................................................................... 3
Lecture Note: Format Text............................................................................................................................................................ 3
Lecture Note: Formatting Paragraphs...................................................................................................................................... 4
Lecture Note: Create and Apply Styles................................................................................................................................... 5
Lecture Note: Edit Text.................................................................................................................................................................. 6
Classroom Activity............................................................................................................ 7
Chapter Objectives
· Format text
· Format paragraphs
· Create
and apply styles
· Edit
text
File Listing
|
Location |
Provided
Filename |
Saved
Filename |
|
Lessons
1-2 |
ID 2-1.indd |
Min-Pin
Intro |
|
Lesson
3 |
ID 2-2.indd |
Jake's
Diner |
|
Lesson
4 |
ID 2-3.indd |
Final
Edit |
|
Skills
Review |
ID 2-4.indd |
Independence |
|
Skills
Review |
ID 2-5.indd |
Toy
Breeds |
|
Skills
Review |
ID 2-6.indd |
Declaration
Edit |
|
Project
Builder 1 |
ID 2-7.indd |
Drop
Cap Modifications |
|
Project
Builder 2 |
ID 2-8.indd |
Hanging
Indents |
|
Design
Project |
ID 2-9.indd |
Latin
Lingo |
|
Group
Project |
ID 2-10.indd |
Crushing
Impact |
Projects to Assign:
The Skills
Review covers
all of the objectives covered in the chapter in a step-by-step progression.
Assign this exercise for extra reinforcement. Solution files will be very
similar.
Two
project builders, a design project, and a group project. These projects include
content from sidebars and marginal information within lessons.
Project
Builder 1 gives
students additional practice working with drop caps.
Project
Builder 2 gives
students additional practice with hanging indents and formatting paragraphs.
Design
Project lets
students practice kerning.
Group
Project allows
students to evaluate the effectiveness of a headline. They are asked to discuss
topics such as the choice of font, and then they practice with formatting the
text using the Character palette.
INSTRUCTOR’S NOTES
Lecture Note: Chapter Overview
In Chapter 2, students will work with text. They will learn about text layout
and formatting paragraphs. They'll also learn about InDesign utilities, such as
Find/Change, and Check Spelling. Students will then learn how to apply
character and paragraph styles to text. This chapter is chock full of new terms
for the students to digest.
Lecture Note: Format
Text
Chapter 2
is about text: text formatting, paragraph formatting and text editing. In
between the lines, Chapter 2 is also about typography. The narrative and the
lessons in Chapter 2 focus on function: How to change a typeface, type size,
how to format a paragraph, create an indent, create a space after a paragraph,
etc. These same functions can be used to create beautiful and sophisticated
typography in InDesign. So, while students are learning the type functions of
InDesign, the instructor may also want to prompt them to consider the
typographical abilities of InDesign as well.
A good
way to do so at this stage of the book is to focus on tracking and kerning.
Lesson 1, Objective 2 offers an exercise in tracking and kerning. This is a
good starting point. Once this lesson is completed, the instructor may want to
encourage students to continue exploring tracking and kerning in InDesign.
First,
the instructor can stress an ease of use: Students should become very
comfortable with tracking and kerning text using the Character palette and with
using keyboard shortcuts for tracking and kerning. This should not be glossed
over: the more comfortable students become with tracking and kerning, the more
they will incorporate it into their work.
Next,
the instructor can have students type a word and then track and kern it as they
see fit. Since “good” tracking and kerning is somewhat subjective, this can
lead to interesting debates between students. One classic word that is often
used as a challenge for tracking and kerning is ATLANTA – in all caps.
Finally,
the instructor can have students tear ads and headlines from newspapers and
magazines that show examples of good and bad tracking choices.
InDesign
CS2 offers a new feature when formatting text called Paste without Formatting.
This command, on the Edit menu, does just what it says. It allows you to paste
copied text without the text's formatting. You can also drag and drop text from
one location to another in CS2. This feature is common in word processing
programs so students should be happy to see it in InDesign.
Another
new feature is the ability to insert footnotes automatically. Click Type on the
menu bar, and then click Insert Footnote. Be sure to point out the Document
Footnote Options dialog box, also on the Type menu. Students who are familiar
with older versions of InDesign will find these new text formatting features
interesting.

Figures
1: Kerning text
Lecture Note: Formatting
Paragraphs
This is
perhaps the most important lecture associated with this chapter, because poor
paragraph formatting is commonplace with both experienced users and novices.
Two
problems are classic: Incorrect indents and incorrect spacing.
The
instructor can begin the lesson by saying: “In InDesign, if you press the
spacebar two times, you’ve made an error.” This will get the students thinking.
It seems like a very broad statement, but it is true. The spacebar is used to
create a space between two words. That’s it. “What about two spaces after a
period?” you might ask. Indeed, that was standard for typewriters, but
inserting two spaces after a period is incorrect formatting when working on a
computer. (Only a single space is necessary; word processing applications apply
an extra space at the end of a sentence).
The
classic crime is pressing the spacebar 5 or 10 times to create an indent at the
beginning of a new paragraph. This is a common error.
The second classic crime is pressing [Return] or [Enter] twice to create a
space after a paragraph. The instructor can note: “In InDesign, if you press
[Return] twice, you’ve made an error.”
It
must be stressed that indents and spaces after paragraphs are formatted in the
Paragraph palette. The instructor must plan for a thorough lecture and
discussion on this fact. Moreover, this lecture should be expanded to include
right indents, inserting a space before a paragraph, pull quotes, and the
important role of the soft return. All of this is covered in Chapter 2. It
needs to be reinforced by the instructor.
Once
students are comfortable with formatting paragraphs, take some time to point
out another new CS2 feature that deals with formatting paragraphs: Bullets and
Numbering. This dialog box, available on the Paragraph palette menu, allows you
to apply bullets or numbers to your text. Students will most likely be very
familiar with this feature from using it in other programs. This is a fun and
self-explanatory feature. Remind students that bullets and numbers are applied
to paragraphs: this will help them remember how to access the feature. See
Figure 2 below.
![]()

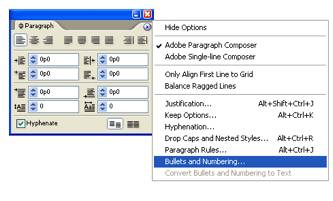
Figure
2: Accessing Bullets and Numbering
Lecture Note: Create
and Apply Styles
Styles
represent one of the great benefits of digital word processing. The ability to
assign a style to a headline or to a paragraph and to use that style throughout
a document is truly a powerful option. The ability to edit those styles and
have the edit execute itself throughout the document saves time and offers
unprecedented consistency. It’s not hard to sell the benefits of working with
styles.
Yet, in
addition to the lessons in the book, many students will need a lecture on
styles to reinforce their importance. Why? Because many younger users tend to
jump right in and start working. This lecture should be designed to encourage
students to plan their document before they start working. Part of that planning will be
to determine styles – headline styles, paragraph styles, styles for pull
quotes, styles for footnotes, etc. The New Paragraph Style dialog box, where
these choices are made, is shown below in Figure 3. Throughout, students should
be reminded that no choice they make with styles is set in stone. Styles can always
be updated.
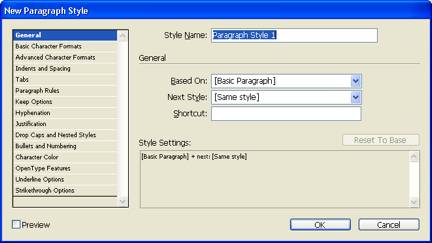
Figure
3: New Paragraph Style dialog box
Another new
feature in CS2 is the Quick Apply command on the Edit menu. Quick Apply allows
you to find and apply a style quickly, select text or a text frame, click Edit
on the menu bar, then click Quick Apply. Begin typing the style name, which
displays matching styles in the Quick Edit list. Click the style that you want
to apply, then click [Enter] (Win) or [return] (Mac) to apply it. As students
will learn later on in the book, you can now apply object styles to objects.
Quick Apply works for object styles as well as character and paragraph styles.
Lecture Note:
Edit Text
Throughout
Chapter 1, we stressed the primary role of InDesign as being a layout
application. This lecture is designed to remind students that InDesign is also
a fully-functional word processing application. This distinction might be lost
on younger student, many of whom will have grown up with computers and have
never used a typewriter.
An
interesting way to begin the lecture would be to ask, “What is word
processing?” This is a term that most if not all of the students will have
heard, but will they be able to define it? Have they ever thought about what it
means? This lecture will give the instructor the opportunity to contrast text
editing in an application like InDesign with that of old-fashioned typewriter
work. The distinctions are endless. For the students, the contrast will spark
an appreciation and a deeper understanding of the power of digital word processing.
This
lecture should flow naturally into a focus on two of the most powerful features
of word processing: The Find/Change dialog box and the Spell Checker. Both of
these features are covered thoroughly in the exercises in Lesson 4. The
instructor is encouraged to introduce this lecture before the students tackle
the exercises in Lesson 4. The instructor should remind students not to take
these features for granted and to explore them more thoroughly. For example,
the Add function of the spell checker – the ability to create a
customized dictionary – is a truly empowering feature and should not be
overlooked.
InDesign
CS2 has added two new features to help with spell checking: Dynamic Spelling
and Autocorrect. Like many of the new type-related features in CS2, these two
may be familiar with students who have used word processing programs. When
Dynamic Spelling is activated, a red squiggly line is drawn under words that
InDesign considers misspelled. Autocorrect will correct a misspelled word if
you type the word incorrectly, and then press [Spacebar] twice. The words that
Autocorrect reacts to must appear in the list of misspelled words in the
Autocorrect Preferences dialog box. Note that you can add your own commonly
misspelled words to the list. See Figure 4 below. Autocorrect and Dynamic
Spelling are found by clicking Type on the menu bar, under the Spelling
command.
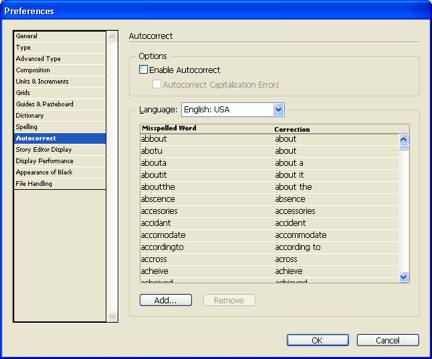
Figure
4: Autocorrect Preferences dialog box
|
Classroom Activity |
Matching
As a
fun way to end this chapter, hand out a quick quiz of matching all of the
terms in this chapter with their definitions. This will be a great way for
students to make sure they are clear on all of the new information. |