
Creates a two-, three-, or four-page panel appropriate to a foldout booklet or brochure. The Bleed Between Pages, Creep, and Signature Size are dimmed when a Consecutive option is selected.
Impose a document for booklet printing See Adobe on printing
Consecutive
Creates a two-, three-, or four-page panel appropriate to a foldout booklet or brochure. The Bleed Between Pages, Creep, and Signature Size are dimmed when a Consecutive option is selected.
For example, if you want to create printer spreads for a traditional six-panel, trifold brochure, choose 3-up Consecutive. You may be accustomed to setting up trifolds as one page with three different columns. With InDesign imposition, you can simply create pages that are the size of each panel.
An 8-page booklet, the pages appear in sequential order in the layout window. However, in printer spreads, page 2 is positioned next to page 7, so that when the two pages are printed on the same sheet, folded, and collated, the pages end up in the appropriate order. 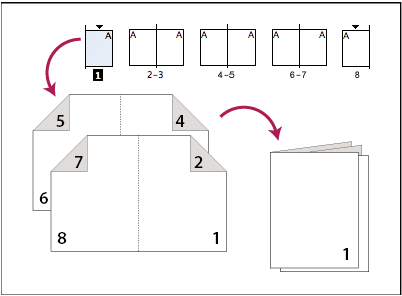
Pages appear in sequence in the layout window, but are printed in a different order so that they appear correct when folded and bound.
The process of creating printer spreads from layout spreads is called imposition. While imposing pages, you can change settings to adjust spacing between pages, margins, bleed, and creep. The layout of your InDesign document is not affected, because the imposition is all handled in the print stream. No pages are shuffled or rotated in the document.
1. Choose File > Print Booklet.
2. If a printer preset has the settings you want, choose it in the Print Preset menu.
To use the print settings (as they appear in the Print dialog box) of the current document, choose Current Document Settings from the Print Preset menu.
3. If you don’t want the entire document to be imposed, select Range in the Setup area and specify which pages to include in the imposition.
Use hyphens to separate consecutive page numbers, and commas for nonadjacent page numbers. For example, typing 3-7, 16 imposes pages 3 through 7 and 16.
Note: If you have divided the document into sections of page numbers, you should enter section page numbers (such as Sec2:11) in the Range field.
4. To change settings such as printer’s marks and color output, click Print Settings. Using the options on the left, change settings as needed, and then click OK.
5. In the Print Booklet dialog box, specify other booklet setup options as appropriate, and then click Print.
Spacing, bleed, and margin options for booklet printing
You can change the following options in the Setup area of the Print Booklet dialog box.
Space Between Pages
Specifies the gap between pages (the right side of the left page and the left side of the right page). You can specify a Space Between Pages value for all the booklet types except Saddle Stitch.
For Perfect Bound documents, if you are creeping in (with a negative value), the minimum Space Between Pages value is the width of the Creep value. If you’re manually creating signatures (for example, if there are different stocks in the same document), you can enter a Space Between Pages value to specify a starting creep for spreads that belong to different signatures.
Bleed Between Pages
Specifies the amount of space used to allow page elements to encroach the gap in Perfect Bound printer spread styles. This option is sometimes referred to as crossover.) The field accepts values between 0 and half the Space Between Pages value. You can specify this option only when 2-up Perfect Bound is selected.
Creep
Specifies the amount of space necessary to accommodate paper thickness and folding on each signature. In most cases, you’ll want to specify a negative value to create a push-in effect. You can specify Creep for 2-up Saddle Stitch and 2-up Perfect Bound booklet types. (See Understanding creep.)
Signature Size
Specifies the number of pages in each signature for 2-up Perfect Bound documents. If the number of pages to be imposed is not evenly divisible by the Signature Size value, blank pages are added to the end of the document as necessary.
Automatically Adjust To Fit Marks And Bleeds
Lets InDesign calculate the margins to accommodate the bleeds and the other printer mark options currently set. The fields under Margins are dimmed when this option is selected, but they reflect the actual values that will be used to fit marks and bleeds. If you deselect this option, you can adjust the margin values manually.
Margins
Specifies the amount of space that surrounds the actual printer spread after trimming. To specify individual values for Top, Bottom, Left, and Right, deselect Automatically Adjust To Fit Marks And Bleeds, and increase the values to insert extra space beyond the default marks and bleeds. (Decreasing the values may result in clipping the marks and bleeds.) You can specify margin values for all booklet printing types.
Print Blank Printer Spreads
If the number of pages to be imposed is not evenly divisible by the Signature Size value, blank pages or spreads are added to the end of the document. Use this option to determine whether those blank spreads at the end of the document are printed. Note that printing other blank pages in the document is controlled by the Print Blank Pages option in the Print dialog box.