INDEX for textedit webpages Previous page Notes for Thursday, October 4, 2007
Have your textedit page open
# Open TextEdit * Open a Finder window # Change the format to plain text * Open the Format tab |
Review last lesson as everyone did not get through it
| You should have this much in your textedit > template page > once you have you can open your template page and save it as whatever name you wish. |
<!DOCTYPE html PUBLIC "-//W3C//DTD XHTML 1.0 Transitional//EN" "http://www.w3.org/TR/xhtml1/DTD/xhtml1-transitional.dtd"> </body> |
Blank Spaces and Paragraph Formatting No matter how many whitespace characters you put in a row, or which ones you use, the browser will only show one single space. If you want to force a line break use the tag <br />. the text following the <br /> tag will continue on the next line. Don't use a <br / > tag at the end of every line. Let the browser wrap your text to Use a <br /> tag when you deliberately have short lines, such as in poetry. Begin paragraphs with a <p> tag and end them with a </p> tag. The browser will automatically skip a line between paragraphs. In HTML people often used to put a <p> tag between paragraphs to separate them, this is not correct in XHTML. Even in HTML, if you put any attributes in the <p> tag, then you will need a closing </p> tag. |
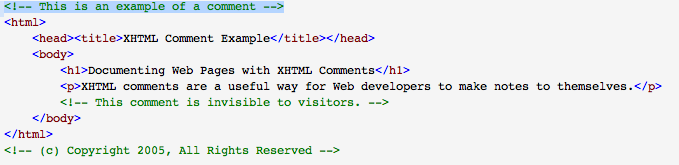
Today we will continute with paragraphs and headings. Firstly, we can make comments in our code that can not be seen by the viewer by putting in <!-- This is an example of a comment --> after the <head> tag
Adding comments to your XHTML documents to remind yourself, or to document to others what you were trying to do in your Web page. XHTML comments only appear in the page source, and are invisible to users browsing your page - i.e. Web browsers ignore the contents of XHTML comments. An XHTML comment example is shown here:
and here
<!DOCTYPE html PUBLIC "-//W3C//DTD XHTML 1.0 Transitional//EN" "http://www.w3.org/TR/xhtml1/DTD/xhtml1-transitional.dtd">
<!-- This is an example of a comment -->
<html xmlns="http://www.w3.org/1999/xhtml" xml:lang="en" lang="en">
<head>
<title>Title of Page goes here</title>
<meta http-equiv="Content-Type" content="text/html; charset=utf-8" />
</head>
<body>
boooooo
</body>
</html>
1. Put a comment in your page
2. XHTML Div - Breaking up a Page Into Divisions XHTML Div
To break up a page into different divisions, follow these steps:
* At the start of the division, type "<div"
* Optionally type in id="name", where name uniquely identifies the division.
* Optionally type in class="name", where name corresponds to the name of the class that the division belongs to.
* Type ">" to complete the opening div tag.
* Create the contents of the division.
* Complete the division by typing "</div>"
Tips and Tricks on How to use the XHTML Div Tag
* A division is a block-level element - i.e., its contents automatically start on a new line.
* id and class are optional attributes used to label your divisions, which can be used with CSS to create powerful page layouts.
* The main difference between an id and a class is that class is for a group of elements while id is for identifying unique, individual elements.
* You can nest div's - in the XHTML div example, an outer div with id="pagecontents" enclosed three nested div's.
* Don't use tables to lay out your HTML pages - use div and span instead! That's the XHTML way!
Breaking up a page into divisions allows you to mark regions of your document, then, in conjunction with Cascading Style Sheets (CSS) you can globally apply styles to an entire region of a page. We'll cover more about CSS in our CSS tutorial section - for now, just remember that the XHTML div tag enables you to create more advanced layouts while making it easier to maintain pages by decoupling a page's content from its' layout.
XHTML <div> Example
Here's an example XHTML code fragment that shows a very typical use of the div tag, used to structure the various parts of a webpage:
Code Sample:
<div id="pagecontents">
<div class="leftnavigation">
<h3>Learning HTML</h3>
<h3>Learning XHTML</h3>
<h3>Learning CSS</h3>
</div>
<div class="centercolumn">
<h1>Tables are Dead! Use <div>'s and CSS Instead</h1>
<p>Div and Span tags along with CSS are the greatest invention since sliced bread.</p>
</div>
<div class="rightcallout">
<h3>Did you Know?</h3>
<p>The XHTML Div tag simplifies advanced page layouts?</p>
</div>
</div>
This goes after the <body> tag
thus your page looks like this 
3. XHTML Span - Creating Inline Spans
To break up a page into different divisions, follow these steps:
* At the start of the division, type "<span"
* Optionally type in id="name", where name uniquely identifies the span of content.
* Optionally type in class="name", where name corresponds to the name of the class that the span belongs to.
* Type ">" to complete the opening span tag.
* Type in the contents of the span.
* Complete the span typing "</span>"
# A span tag has no inherent formatting - you need to associate it with a particular style defined elsewhere, using the class or id attribute.
# The difference between id and class is that id is for identifying individual, unique elements, where as class is used for a group of elements.
# We'll learn how to use span with CSS later in the CSS tutorial section.
# Don't use font tags to style inline elements - use span tags instead!
The XHTML span tag alows you to further organize your page's content into smaller chunks or spans of information. By naming spans of text, you can use Cascading Style Sheets (CSS) to apply styles to those regions in a global manner. The XHTML span tag simplifies the development of advanced layouts by further decoupling a page's content from its' presentation on a more granular level.
XHTML <span> Example
Here's an example XHTML code fragment that shows a typical use of the span tag, used to apply various formatting to certain in-line aspects of a page's contents:
Code Sample:
<p>The XHTML span tag is useful for applying inline styles such as a different font
<span style="font-size:large;">size</span> or <span style="color:red;">color</span>
to your content.</p>
<p>You'll find that the span tag is <span style="font-style:italic;">very</span>
helpful in maintaining consistent styles across your site.</p>
view code in new window.
render sample in browser.
Download code sample on your computer.
The preceeding XHTML span example shows how you might use span tags to mark up certain aspects of a page, for example, code fragments, which might be displyed using a monospace font like courier new -- or to bring attention to certain key words that might require special emphasis, for example, through the application of an underline, bold, or larger font face. Every enclosed <span> references either a class or an id, which corresponds to a particular style defined in a stylesheet somewhere else - typically in a separate file. Using XHTML span you could then update your styles for code text, or emphasis text, or whatever, simply by updating a single stylesheet, rather then manually going through all of your documents, which is more managable and saves time.
4. Adding an Image (of course you need to have your image saved on your desktop or in your folder ) <img src="nameofyourimagefile.gif" height="100" width="100" alt="Sensible description of your image." />
if the image is on another server you will need to use the entire URL (eg: http://www.domain-of-image.com/path/image.gif ). Usually you should avoid pulling images off of other servers. It slows down load time and if you don't have permission from the other site they could get angry at you for stealing bandwidth and remove the image or replace it with something you don't want.
Other img attributes (with CCS we will not be doing these as frequently
align
To make text wrap around an image you need to add an align attribute to the image tag. align="right" will put the image to the right side of the text and align="left" will put it to the left. If you want text inbetween two images, first put the one that is aligned right, then the one aligned left, and then the text that goes in the middle.
If the image is align="top" then the top of it is lined up to the top of the text.
If the image is align="bottom" then the bottom of it lines up to the bottom of the text.
If the image is align="center" then it puts its center at the bottom of the text These alignments are very quirky though. If these three lines were on the same line they won't work right. I very rarely use these, but I use "right" and "left" all the time.
hspace, vspace
hspace stands for horizontal space, with it you can set how much space there is on the sides of an image before the text or next image.
vspace stands for vertical space, with it you can set how much space there is on the top and bottom of an image before the text or next image.
Using image as a link
To use an image as a link, all you have to do is place it between a link <a href=....> tag and a </a> tag. You may place text within the same a href tag if you wish. Be extra sure to use useful alt text for an image used as a link.
There will be a border around the graphic in the same color as your links are when you use it as a link. If you don't want the border you will need to add border="0" inside the image tag.