year ten design DAILY NOTES Return to year 10 Home / student work / Calendar/ Moodle / Wiki / My Dwight / Curriculum Map TECHNOLOGY HOMEPAGE
TECHNOLOGY |
||
| Criteria | Name | Max |
| A | investigate | 6 |
| B | design | 6 |
| C | plan | 6 |
| D | create | 6 |
| E | evaluate | 6 |
| F | attitudes in technology | 6 |
Check here at the start of class for what we will do today ~ as well as for any special notes. Today's class will be at the top of the list. HOME PAGE FOR TECHNOLOGY COURSES
Each of these panels will be individualized for your approach with a graphic.
Starting InDesign CS3.
1. In your applications folder open InDesign CS3 (not CS2)
2. We have a text book that we will follow - please collect one then return it at the end of the class.
3. Our student files that are used in the book are in (on your desktop menu at the top 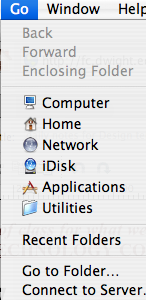 ) click on "Connect to Server". Navigate to the group folder Go > Computer > 2011 GroupFolder > DataFiles > InDesign > Chapter 1" and open InDesign and Chapter One and click on
 ![]() . If the '
. If the '![]() ' box appears click it . We will go through the panels of InDesign. Look at the Toolbox overview and pages 1-2 > 1-9. Try each tool.
' box appears click it . We will go through the panels of InDesign. Look at the Toolbox overview and pages 1-2 > 1-9. Try each tool.
1
|
InDesign: Exploring
the InDesign Workspace
|
·
Explore
the InDesign Workspace
·
Change
Document Views
·
Navigate
Through a Document
·
Use
InDesign Help
|
This is the section you are responsible for don't muck it up... it must be finished today as I have to present it next Monday.
Reya Benitez > (1) Width = 1-12, (2) 12 - 24, in the first row (1 - 12 down) (with each section 12 pixels height)
Aimee Daniels > (3) 24-36, (4) 36 - 48, in the first row (1 - 12 down) (with each section 12 pixels height)
Gabrielle Gaines > (5) 48 - 60 in the first row (6) (1 - 12) in the second row (12-24 down) 1- 12 W across
Vittoria Kamen > (7) 12 - 24 W, and (8) 24 - 36 W > in the second row (12-24 down)
Maxwell McDermott > (9) 36 - 48 and (10) 48 - 60 W in the second row (12-24 down)
Adam Mitchell > (11) 1-12 and (12) 12 - 24, in the third row (24 - 36 down)
Erica Moser > (13) 24 - 36 W and (14) 36 - 48 W in the third row (24 - 36 down)
Kenzo Semper > (15) 48 - 60 in the third row (24 - 36 down) and (16) 1 - 12 in the fouth row (36-48) down
Luke Soloway > (17) 12 - 24 W, and (81) 24 - 36 W > in the fourth row (36-48 down)
Katharine Yellin > (19) 36 - 48 W and (20) 48 - 60 in the fourth row (36-48 down)
> (21) 1 -12 W and (22) 12 - 24 in the fifth row (48 - 60 down)
> (23) 24 - 36 W and 3 (24) 6 - 48 and (25) 48 - 60 in the fifth row (48 - 60down)
1. Finish the photo - your section and blow it up to 11 inches wide then print your section - Once you have your section then re-size it  to 10 inches wide >
IMPORTANT - put your name on the back and the section your did; for example, (25) 48 - 60 in the fifth row "Fideo". This should not take more than 13 minutes to complete. Lay it all out on the table to see that it looks complete then put it in the folder that is provided [Cadra].
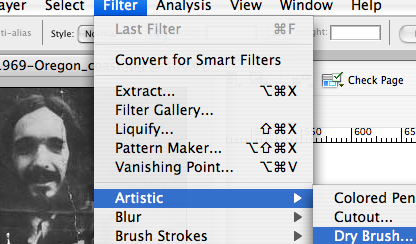
2. Using your image go to FILTERS > ARTISITC and select DRY BRUSH with the same settings as shown here and do your selections using these settings tne put them in the folder provided [Cadra]. Be sure to put your name on the back and the section your did; for example, 10 - 20 H and 1- 12 W "Fideo
 THEN
THEN 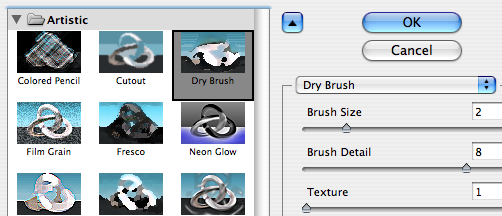

The way we will do this is to divide the photo into 35 segments with each of you having 3 segments to blowup. Firstly. open photoshop and open the photo of Mr. Cadra. You will take your sections and enlarge them to 11 inches by about 8 inches.
Be sure the ruler is showing (View > Rulers). Each person will have a section that is 12 X 10 pixels. Save your section by the number; and as .jpegfor example 1.jpeg ![]()
 and at maxium quality.
 to your desktop. Once you have your three sections drag you three images into the Cadr folder in studentweb (10-design)
Once you have your section then re-size it to 10 inches wide >